import android.support.design.widget.FloatingActionButton;
import android.support.design.widget.Snackbar;
でエラーがでる!!
何でだ
調べたところ、ライブラリーのヴァージョンが悪いらしい。
compile 'com.android.support:design:23.4.0'
↓
compile 'com.android.support:design:23.1.0'
に変更して、ビルドするとエラーがでなくなりました。
2016年8月13日土曜日
2016年7月28日木曜日
エラー java.lang.ClassCastException: android.widget.LinearLayout$LayoutParams cannot be cast to android.widget.FrameLayout$LayoutParams
Fragmentを用いた時にこのようなエラーがでた。
エラー java.lang.ClassCastException: android.widget.LinearLayout$LayoutParams cannot be cast to android.widget.FrameLayout$LayoutParams
原因
onAttachのオーバーライド忘れ
オー恥ずかしい。。。。
格闘すること2時間でした。
エラー java.lang.ClassCastException: android.widget.LinearLayout$LayoutParams cannot be cast to android.widget.FrameLayout$LayoutParams
原因
@Overridepublic void onAttach(Activity activity) {
    super.onAttach(activity);    try {
        mListener = (OnFragmentInteractionListener) activity;    } catch (ClassCastException e) {
        throw new ClassCastException(activity.toString()
                + " must implement OnFragmentInteractionListener");    }
}
onAttachのオーバーライド忘れ
オー恥ずかしい。。。。
格闘すること2時間でした。
2016年6月2日木曜日
エラー Expected resource oy type styleable 何も問題ないのに、R.も記述しているのに @SuppressWarnings("ResourceType")
そんなときはActivityの上に
@SuppressWarnings("ResourceType")
例)
@SuppressWarnings("ResourceType")
public class hogeActivity extends Activity implements OnTouchListener {
}
こうすると、エラーがでなくなります。
2015年12月10日木曜日
エラー Error:Execution failed for task ':compileDebugAidl'. > Executor Singleton not started
Error:Execution failed for task ':compileDebugAidl'.
> Executor Singleton not started
このようなエラーがでた。
調べるとGradleのバージョンが低いらしい。
Gradleのバージョンアップ
をしたらエラーがでなかった。
Gradleのバージョンアップ方法
プロジェクトでマウスホバーして、右クリック→「Opne Module Setting」

でプロジェクトを選択

> Executor Singleton not started
このようなエラーがでた。
調べるとGradleのバージョンが低いらしい。
Gradleのバージョンアップ
をしたらエラーがでなかった。
Gradleのバージョンアップ方法
プロジェクトでマウスホバーして、右クリック→「Opne Module Setting」

でプロジェクトを選択

2015年10月20日火曜日
SQLite使い方 --01 導入編
Android端末内で情報を保存する際に、
以前紹介した
http://androidgamepark.blogspot.jp/2013/01/preferencemanager-sharedpreferences.html
もありますが、今回はSQLiteを使ったデータ管理方法を記します。
また、SQLの事を深く掘り下げはしないので、SQLが何かよくわからない人はこの先は見てもいいことないです。。。
とりあえずの今回はSQLite導入方法を紹介します。
使うのは
SQLiteDatabaseと
SQLiteOpenHelperをextendしたクラスです。
■DBコネクト
public class SQliteOpenHelperClass extends SQLiteOpenHelper {
public SQliteOpenHelperClass(Context c) {
super(c, DB, null, DB_VERSION);
}
@Override
public void onCreate(SQLiteDatabase db) {
db.execSQL(CREATE_TABLE);
}
@Override
public void onUpgrade(SQLiteDatabase db, int oldVersion, int newVersion) {
db.execSQL(DROP_TABLE);
onCreate(db);
}
}
これを通して、DBに接続したり、クエリーを発行します。
SQliteOpenHelperClass oSQLhlpr = new SQliteOpenHelperClass( getApplicationContext());
SQLiteDatabase oDB = oSQLhlpr.getWritableDatabase();
こんな感じで生成します。引数にContextですね。
getWritableDatabase()でデータベースにコネクトします。
コネクト時にOnCreateを読んで、
テーブルが存在しなかったら、テーブルを作成します。
onUpgradeは引数のDBバージョンがテーブル作成時より大きかったら呼ばれます。
■クエリー
・select系
Cursor型 = rawQuery(String sql文, String[] selectionArgs)
Cursor型 = query(String table, String[] columns, String selection, String[] selectionArgs, String groupBy, String having, String orderBy)
・insert専用
long型 = insert(String table, String nullColumnHack, ContentValues values)
・引数がいらない場合(insert系)
execSQL(文字列鋳型(SQL文))
クエリーの取得するメソッドはいろいろあります。
■サンプルソース
・メインアクティビティー
package jp.co.appli.sqlitetest;
import android.app.Activity;
import android.app.ActionBar;
import android.content.ContentValues;
import android.content.Context;
import android.database.Cursor;
import android.database.sqlite.SQLiteDatabase;
import android.database.sqlite.SQLiteOpenHelper;
import android.os.Bundle;
import android.view.View;
import android.view.ViewGroup;
import android.widget.AdapterView;
import android.widget.Button;
import android.widget.LinearLayout;
import android.widget.ListView;
public class MainActivity extends Activity implements View.OnClickListener {
static final String DB = "sqlite_sample.db";
static final int DB_VERSION = 1;
static final String TABLE_NAME = "sample_table";
static final String CREATE_TABLE = "create table " + TABLE_NAME +" ( sample_id integer primary key autoincrement, test_id integer not null, memo text not null );";
static final String DROP_TABLE = "drop table "+ TABLE_NAME +";";
static SQLiteDatabase oDB;
private SampleAdapter sampleAdapter;
//レイアウトパラメータ
private final int WC = ViewGroup.LayoutParams.WRAP_CONTENT;
private final int MP = ViewGroup.LayoutParams.MATCH_PARENT;
private ListView listView;
private CharSequence mTitle;
@Override
protected void onCreate(Bundle savedInstanceState) {
super.onCreate(savedInstanceState);
//メイン画面の作成
LinearLayout oLayout =new LinearLayout( getApplicationContext());
oLayout.setOrientation(LinearLayout.VERTICAL);
setContentView(oLayout);
//リストビューの作成
listView = new ListView(getApplicationContext());
//リストビューのアダプターを作成
sampleAdapter = new SampleAdapter(getApplicationContext());
//SQLiteとの橋渡しするクラス
SQliteOpenHelperClass oSQLhlpr = new SQliteOpenHelperClass( getApplicationContext());
//DBに接続する
oDB = oSQLhlpr.getWritableDatabase();
//セレクト分の実行結果を取得
Cursor cursor = oDB.query( TABLE_NAME, new String[] {"sample_id", "test_id", "memo"}, null, null, null, null, "sample_id DESC");
//アダプターの作成
makeAdapter(cursor);
cursor.close();
//リストビューにアダブターを設定
listView.setAdapter( sampleAdapter );
listView.setLayoutParams( new ActionBar.LayoutParams( WC, MP ) );
//リスト選択時の処理を記述
listView.setOnItemClickListener(new AdapterView.OnItemClickListener() {
//選択されたリストを消去する処理
@Override
public void onItemClick(AdapterView<?> parent, View view, int position, long id)
{
//アダプタから、アイテムを取得
ItemClass item = sampleAdapter.getItem(position);
//デリートメソッドを発行
oDB.delete( TABLE_NAME, "sample_id = ?", new String[]{ String.valueOf(item.getPrimary()) } );
//テーブル情報を取得
Cursor cursor = oDB.query( TABLE_NAME, new String[] {"sample_id", "test_id", "memo"}, null, null, null, null, "sample_id DESC");
//リストビュー内のアダプターを作成
makeAdapter(cursor);
cursor.close();
//Adapteの中身を更新
sampleAdapter.notifyDataSetChanged();
//リストビューの再描画
listView.invalidateViews();
}
});
//追加ボタンの作成
Button AddBtn = new Button( getApplicationContext() );
AddBtn.setOnClickListener( this );
AddBtn.setId( 1 );
AddBtn.setText( "追加" );
AddBtn.setLayoutParams( new ActionBar.LayoutParams( WC,WC ) );
//削除ボタンの作成
Button DelBtn = new Button( getApplicationContext() );
DelBtn.setOnClickListener( this );
DelBtn.setId( 2 );
DelBtn.setText( "全削除" );
DelBtn.setLayoutParams( new ActionBar.LayoutParams( WC,WC ) );
oLayout.addView( AddBtn );
oLayout.addView( DelBtn );
oLayout.addView( listView );
}
private void makeAdapter( Cursor cursor )
{
sampleAdapter.truncateItemList();
for (boolean next = cursor.moveToFirst(); next; next = cursor.moveToNext())
{
ItemClass item = new ItemClass();
item.setPrimary( cursor.getInt( 0 ) );
item.setMemo( cursor.getString( 2 ) );
sampleAdapter.addItem(item);
}
}
@Override
public void onClick(View view)
{
if (view.getId() == 1)
{
ContentValues values = new ContentValues();
values.put( "test_id", 4 );
values.put( "memo", "こんなところに来てしまったあ" );
oDB.insert( "sample_table", null, values );
Cursor cursor = oDB.query( TABLE_NAME, new String[] {"sample_id", "test_id", "memo"}, null, null, null, null, "sample_id DESC");
makeAdapter(cursor);
cursor.close();
}
else if (view.getId() == 2)
{
//全件削除
oDB.delete("sample_table", "test_id like '%'", null);
//全件取得メソッド
Cursor cursor = oDB.query("sample_table", new String[] {"sample_id", "test_id", "memo"}, null, null, null, null, "sample_id DESC");
makeAdapter(cursor);
cursor.close();
}
//Adapteの中身を更新
sampleAdapter.notifyDataSetChanged();
listView.invalidateViews();
}
public class SQliteOpenHelperClass extends SQLiteOpenHelper
{
public SQliteOpenHelperClass(Context c) {
super(c, DB, null, DB_VERSION);
}
@Override
public void onCreate( SQLiteDatabase db )
{
db.execSQL( CREATE_TABLE );
}
@Override
public void onUpgrade( SQLiteDatabase db, int oldVersion, int newVersion )
{
db.execSQL( DROP_TABLE );
onCreate(db);
}
}
}
・アダプタクラス
package jp.co.appli.sqlitetest;
import android.content.Context;
import android.graphics.Color;
import android.view.ViewGroup;
import android.view.View;
import android.widget.BaseAdapter;
import android.widget.LinearLayout;
import android.widget.TextView;
import java.util.List;
import java.util.ArrayList;
public class SampleAdapter extends BaseAdapter
{
//コンテキストを取得
private Context mContext;
//リスト情報を格納している配列
private List<ItemClass> dataList = new ArrayList<ItemClass>();
//レイアウトパラムの定数
private final int MP = ViewGroup.LayoutParams.MATCH_PARENT;
//コンストラクターで生成時に呼ばれる
public SampleAdapter( Context context )
{
//生成時のコンストラクターでコンテクストを取得
mContext = context;
}
@Override
public int getCount()
{
//リストの行数
return dataList.size();
}
@Override
public ItemClass getItem(int posion)
{
//配列の中身を返す
return dataList.get(posion);
}
@Override
public long getItemId(int posion) {
//現在の配列の場所
return posion;
}
@Override
public View getView(int position, View view, ViewGroup parent) {
View v = view;
if( v == null ){
//グリットビューの1マス内のレイアウトを作成
LinearLayout oListLayout = new LinearLayout(mContext);
//左から右にアイテムを追加
oListLayout.setOrientation(LinearLayout.HORIZONTAL);
//テキストビューを生成
TextView primaryText = new TextView(mContext);
//文字大きさの指定
primaryText.setTextSize(10);
//文字の色も指定
primaryText.setTextColor(Color.BLACK);
//判別用にタグをつける
primaryText.setTag( "primary" );
//テキストビューを生成
TextView memoText = new TextView(mContext);
//文字大きさの指定
memoText.setTextSize(15);
//文字の色も指定
memoText.setTextColor(Color.BLACK);
//判別用にタグをつける
memoText.setTag("memo");
oListLayout.addView( primaryText );
oListLayout.addView( memoText );
v = oListLayout;
}
ItemClass item = getItem( position );
//配列から、アイテムを取得
if( dataList != null)
{
//タグからテキストビューを取得
TextView primaryText = (TextView)v.findViewWithTag( "primary" );
//取得したテキストビューに文字列を設定
primaryText.setText( String.valueOf( item.getPrimary() ) );
TextView memoText = (TextView)v.findViewWithTag( "memo" );
//取得したテキストビューに文字列を設定
memoText.setText( String.valueOf( item.getMemo() ) );
}
return v;
}
//データリストの追加
public void addItem(ItemClass item)
{
dataList.add( item );
}
//データリストの削除
public void deleateItem(int iPos){
dataList.remove(iPos);
}
public void truncateItemList(){
dataList.clear();
}
}
class ItemClass
{
private String memo;
private int primary;
public void setMemo( String _memo )
{
memo = _memo;
}
public void setPrimary( int _primary )
{
primary = _primary;
}
public String getMemo()
{
return memo;
}
public int getPrimary()
{
return primary;
}
}
■実行結果
1.初期表示

2.追加ボタンを押す

3.行を選択すると消える(途中の数字が抜けてる)

4.全削除を押すと全部消える

5.また、追加できる(auto incrementなので数字は受け継がれる)

こんな感じになります。
■select
//全件取得メソッド
Cursor cursor = oDB.query( TABLE_NAME, new String[] {"sample_id", "test_id", "memo"}, null, null, null, null, "sample_id DESC");
クエリーのところはPDOのノリで大丈夫です。
第3引数にWHERE句、第4引数にパラメータをわたします。
//sample_idの18と20のみを取得する
Cursor cursor = oDB.query( TABLE_NAME, new String[] {"sample_id", "test_id", "memo"}, "sample_id = ? or sample_id = ?", new String[]{"18", "20" }, null, null, "sample_id DESC");
? の場所にパラメータを代入させます。型は文字列で。
■cursor
makeAdapterの
item.setPrimary( cursor.getInt( 0 ) );
item.setMemo( cursor.getString( 2 ) );
ここで、メソッドの取得結果を格納しています。
指定したフィールドから、配列で値が返ってきます。
今回はサンプルソースなので、いろいろな場所から、クエリーを発行していますが、
実際にリリースするアプリでは、クエリーの作成する場所や発行する場所は決めておいた方がいいと思います。
このソース内のSQliteがどのようにデータを持っているか確認するには、
http://androidgamepark.blogspot.jp/2015/10/androidsqlite-sqlite.html
を参照して下さい。
2015年10月1日木曜日
Android端末内(もしくはエミュレータ)のSQLite確認方法 SQLite保存場所 コマンド一覧
Android端末内(エミュレータ)のSQLite確認方法
1.指定したアプリのSQLiteに接続しよう!!
①SQLiteを確認したい端末(もしくはエミュレータに)に接続
②端末から、Sqliteに接続
まず①の手順
Android-SDK のパス
下画像のSDK Pathのパス

にターミナルで移動(Windowsはコマンドプロンプト)
platform-tools/
に移動
パスとしてはこうなっている状態で
/sdk/platform-tools
./adb shell
このコマンド打って成功すると、
root@android:/ #
左側に上記のような文字が書かれる。
注意点としては、PCに接続した端末あるいはエミュレータが起動していること!!
これで①完了
②手順
root@android:/ #
この状態でお願い致します。
■DB保存場所
/data/data/パッケージ名/databases/DB名(拡張子が.dbのファイル)
例えば
/data/data/jp.co.appli.sqlitetest/databases/sqlite_sample.db
■SQLiteの立ち上げ
sqlite3 DBパス
カーソル左側が
sqlite>
になれば接続完了
上手く行かない人はDBのディレクトリに移動してから、
sqlite3 DB名
最後に
■SQLiteコマンド一覧
・テーブル一覧表示
.tables
・テーブルの構造確認
.schema
もしくは
.schema テーブル名
・終了
.exit
1.指定したアプリのSQLiteに接続しよう!!
①SQLiteを確認したい端末(もしくはエミュレータに)に接続
②端末から、Sqliteに接続
まず①の手順
Android-SDK のパス
下画像のSDK Pathのパス

にターミナルで移動(Windowsはコマンドプロンプト)
platform-tools/
に移動
パスとしてはこうなっている状態で
/sdk/platform-tools
./adb shell
このコマンド打って成功すると、
root@android:/ #
左側に上記のような文字が書かれる。
注意点としては、PCに接続した端末あるいはエミュレータが起動していること!!
これで①完了
②手順
root@android:/ #
この状態でお願い致します。
■DB保存場所
/data/data/パッケージ名/databases/DB名(拡張子が.dbのファイル)
例えば
/data/data/jp.co.appli.sqlitetest/databases/sqlite_sample.db
※補足
コマンドはリナックスなので、
ディレクトリ移動は
cd
ファイル一覧表示は
ls
こんな感じで移動
cd /data/data/jp.co.appli.sqlitetest/databases/
■SQLiteの立ち上げ
sqlite3 DBパス
カーソル左側が
sqlite>
になれば接続完了
上手く行かない人はDBのディレクトリに移動してから、
sqlite3 DB名
最後に
■SQLiteコマンド一覧
・テーブル一覧表示
.tables
・テーブルの構造確認
.schema
もしくは
.schema テーブル名
・終了
.exit
2014年9月25日木曜日
Eclipseから、Android Studioへ移行してみた
Eclipseから、Android Studioへ移行してみた
Android Studio
http://developer.android.com/sdk/installing/studio.html#download
↑
ここから、ダウンロードできます。
特徴&感想
・ベースのIDEが『IntelliJ』
→『Eclipse』はIDEの名称です。IDEがわからない人は特に気にしなくても
・コード補完やリファクタリング機能が賢くなった。と感じる。
→リソースの紐付けも、ズレにくくなっていると感じます。。。。
・見た目がかっこいい!!
→Preferences→Appearance→ ThemeをDarculaにすると、なかなか
・Gitの管理が簡単!!
・Android SDK Managerの初回のインストールが不要!!
→落としてから、いきなり使えます!!(MAC *Windowsは環境パスの設定とかJDKが必要かも??)
・ログが見やすい。。
・ワークスペースがいらない!!
→ビルドツールと各プロジェクトのモジュールの管理方法が『Eclipse』と異なります。


まとめ
・使ってみると、ストレートにいい感じです。『Eclipse』でできていたことは大抵できるし、直感的に操作できるUIになっているかと思います。
今後はAndroidStudioで開発していこうと思います。
Android Studio
http://developer.android.com/sdk/installing/studio.html#download
↑
ここから、ダウンロードできます。
特徴&感想
・ベースのIDEが『IntelliJ』
→『Eclipse』はIDEの名称です。IDEがわからない人は特に気にしなくても
・コード補完やリファクタリング機能が賢くなった。と感じる。
→リソースの紐付けも、ズレにくくなっていると感じます。。。。
・見た目がかっこいい!!
→Preferences→Appearance→ ThemeをDarculaにすると、なかなか
・Gitの管理が簡単!!
・Android SDK Managerの初回のインストールが不要!!
→落としてから、いきなり使えます!!(MAC *Windowsは環境パスの設定とかJDKが必要かも??)
・ログが見やすい。。
・ワークスペースがいらない!!
→ビルドツールと各プロジェクトのモジュールの管理方法が『Eclipse』と異なります。
まとめ
・使ってみると、ストレートにいい感じです。『Eclipse』でできていたことは大抵できるし、直感的に操作できるUIになっているかと思います。
今後はAndroidStudioで開発していこうと思います。
2014年2月20日木曜日
エラー (ADT のこのバージョンは Android SDK ツールの改訂 ~)This Android SDK requires Android Developer Toolkit version or above. Curre...version is Please update ADT to the latest version.

eclipseを立ち上げたら、こんなエラーがでた!!
ADTのバージョンが古いのかな??
SDKツールとか言っているので、

SDKマネージャーを立ち上げ
~22.3と書いてあったので、
Android SDK Toolsにチェックを入れて、インストール

eclipseを再起動したら、OK!!
ダイアログは出現しなくなりました!!
が、しかしBuildが上手くできない!!
R.~がエラーになる
Android SDK Build-toolsもインストールしなければダメぽ

2014年2月17日月曜日
ファイルの書き込み、生成(FileOutputStream, file:///data/data/)
ファイルの読み込みをやったので、今回はファイルの書き込みを。
//アウトプットストリームの生成
openFileOutput( ファイル名:String型, モード:int型)
こんな感じで使います。↓
FileOutputStream oOutStreame = openFileOutput( "test.htmk", MODE_PRIVATE );
モードの定数はこちら
MODE_WORLD_READABLE 他のアプリから参照可
MODE_WORLD_WRITEABLE 他のアプリから書き込み可
MODE_PRIVATE 他のアプリからアクセス不可
MODE_APPEND ファイルがあると、追記

//アウトプットストリームの生成
openFileOutput( ファイル名:String型, モード:int型)
こんな感じで使います。↓
FileOutputStream oOutStreame = openFileOutput( "test.htmk", MODE_PRIVATE );
モードの定数はこちら
MODE_WORLD_READABLE 他のアプリから参照可
MODE_WORLD_WRITEABLE 他のアプリから書き込み可
MODE_PRIVATE 他のアプリからアクセス不可
MODE_APPEND ファイルがあると、追記
また、モードを複数指定する場合には
パイプを繋げると複数指定できます。
MODE_PRIVATE | MODE_APPEND
また、ファイルの保存場所は
file:///data/data/" パッケージ名 + /files/ + 作成したファイル名
こちらになります。
SDカードに保存する方法に関しては、また今度
■サンプルソース
package com.example.filemgr;
import java.io.FileOutputStream;
import java.io.IOException;
import android.os.Bundle;
import android.app.Activity;
import android.webkit.WebView;
import android.widget.LinearLayout;
public class MainActivity extends Activity {
@Override
protected void onCreate(Bundle savedInstanceState) {
@Override
protected void onCreate(Bundle savedInstanceState) {
super.onCreate(savedInstanceState);
//ファイル名
String sFileName = "test.html";
//書き込み内容
String sText = "<font color=\"red\">Goodbye World!!</font>";
try {
//アウトプットストリームの生成
FileOutputStream oOutStreame = openFileOutput(sFileName, MODE_PRIVATE | MODE_APPEND);
//アウトプットストリームに書き込み
oOutStreame.write(sText.getBytes());
} catch (IOException e) {
// TODO 自動生成された catch ブロック
e.printStackTrace();
}
//WebViewの生成
WebView oWebView = new WebView( getApplicationContext() );
WebView oWebView = new WebView( getApplicationContext() );
//ファイルの保存先はこちらだ↓ "file:///data/data/パッケージ名 + files + 作成したファイル名
String sUrl = "file:///data/data/" + getPackageName() +"/files/" + sFileName;oWebView.loadUrl( sUrl );
String sUrl = "file:///data/data/" + getPackageName() +"/files/" + sFileName;oWebView.loadUrl( sUrl );
//レイアウトの生成とテキストの貼り付け
LinearLayout oLayout = new LinearLayout(getApplicationContext());
oLayout.addView(oWebView);
//レイアウトを表示
setContentView(oLayout);
LinearLayout oLayout = new LinearLayout(getApplicationContext());
oLayout.addView(oWebView);
//レイアウトを表示
setContentView(oLayout);
}
}
■実行結果
今回は拡張子をhtmlにしましたが基本的には、何でも大丈夫です。
注意点としては、ファイルを書き込む際にフルパスを指定しないことです。
2014年2月9日日曜日
AndrdoiMainifest.xml-03 (ホーム画面とアイコン, android.intent.category.LAUNCHER)
あまり使う機会がないと思いますが、


android.intent.category.LAUNCHER
を複数のActivityに記述した時の挙動を紹介したいと思います。
一応
このページの続きなので、訳わからない人は上のリンクを参照してください。
用意するものは
複数のActivity
複数のicon
■サンプルソール
・メインのアクティビティ
package co.jp.test.manifest.xml;
import android.os.Bundle;
import android.app.Activity;
import android.widget.LinearLayout;
import android.widget.TextView;
public class MainActivity extends Activity {
@Override
protected void onCreate(Bundle savedInstanceState) {
super.onCreate(savedInstanceState);
//テキストビューの生成
TextView oTextView = new TextView(getApplicationContext());
oTextView.setText("メイン画面");
//LinearLayoutの生成
LinearLayout oLayout = new LinearLayout(getApplicationContext());
oLayout.addView(oTextView);
setContentView(oLayout);
}
}
・サブのアクティビティ
package co.jp.test.manifest.xml;
import android.os.Bundle;
import android.app.Activity;
import android.widget.LinearLayout;
import android.widget.TextView;
public class SubActivity extends Activity {
@Override
protected void onCreate(Bundle savedInstanceState) {
super.onCreate(savedInstanceState);
@Override
protected void onCreate(Bundle savedInstanceState) {
super.onCreate(savedInstanceState);
//テキストビューの生成
TextView oTextView = new TextView(getApplicationContext());
oTextView.setText("サブ画面");
TextView oTextView = new TextView(getApplicationContext());
oTextView.setText("サブ画面");
//LinearLayoutの生成
LinearLayout oLayout = new LinearLayout(getApplicationContext());
Layout.addView(oTextView);
setContentView(oLayout);
}
LinearLayout oLayout = new LinearLayout(getApplicationContext());
Layout.addView(oTextView);
setContentView(oLayout);
}
}
・AndroidManifest.xml
<?xml version="1.0" encoding="utf-8"?>
<manifest xmlns:android="http://schemas.android.com/apk/res/android"
package="co.jp.test.manifest.xml"
android:versionCode="1"
android:versionName="1.0" >
<uses-sdk
android:minSdkVersion="8"
android:targetSdkVersion="17" />
<application
android:allowBackup="true"
android:icon="@drawable/ic_launcher"
android:theme="@style/AppTheme" >
<activity
android:name="co.jp.test.manifest.xml.MainActivity"
android:label="activityのラベル" >
<intent-filter>
<action android:name="android.intent.action.MAIN" />
<category android:name="android.intent.category.LAUNCHER" />
</intent-filter>
</activity>
<activity
android:name="co.jp.test.manifest.xml.SubActivity"
android:icon="@drawable/icon2"
android:label="subactivityのラベル" >
<intent-filter>
<action android:name="android.intent.action.MAIN" />
<category android:name="android.intent.category.LAUNCHER" />
</intent-filter>
</activity>
</application>
</manifest>
■実行結果
こんな画面が立ち上がると思います。
端末のホーム画面を見ると
"activityのラベル"と書かれたアイコンが表示されています。
一番左下に存在するのが、subactivityです。
AndroidManifest.xmlで最後に記述したactivityです。
タッチすると
ちゃんとサブの方が表示されました。
1つのアプリで複数のアイコンをホーム画面に表示できました。
この機能を使う機会があるのかはわかりませんが。。。
2014年2月3日月曜日
ローカルのHTMLファイルを表示(ローカルファイル,file:///android_asset)
Webページではなくローカルのhtmlファイルを表示する方法を共有します。
iPhoneは規約のせいで、編集できないローカルにもたなければいけないファイルが
ありますが、Androidには特にありません。。
なので、あまり使う機会はないと思いますが、
ローカルでファイルを管理する時に必要だと思うので、覚えておいて損はないです。
■ローカルファイルの配置
【プロジェクト名で右クリック】→【新規】→【ソース・フォルダ】→assetsという名のフォルダ作成
■ローカルファイルの配置
適当なテキストエディタを開き
<html xmlns="http://www.w3.org/1999/xhtml" xml: lang="ja">
<body>
<p>Hello World!!</p>
</body>
</html>
「test.html」をassetsフォルダにドラッグ
■サンプルソース
package com.example.filemgr;
import android.os.Bundle;
import android.app.Activity;
import android.webkit.WebView;
public class MainActivity extends Activity {
@Override
protected void onCreate(Bundle savedInstanceState) {
super.onCreate(savedInstanceState);
WebView oWebView = new WebView(getApplicationContext());
oWebView.loadUrl( "file:///android_asset/test.html" );
setContentView(oWebView);
}
}
■実行結果

こんな感じで完了です。
■おまけ
package com.example.filemgr;
import java.io.IOException;
import android.os.Bundle;
import android.app.Activity;
import android.webkit.WebView;
public class MainActivity extends Activity {
@Override
protected void onCreate(Bundle savedInstanceState) {
super.onCreate(savedInstanceState);
//assets直下のファイルを一覧で表示
String sMergeString = "";
try {
//assetsフォルダ直下に何があるかを表示
String[] sFileList = getAssets().list("");
//ファイル一覧を取得
for(String file : sFileList){
sMergeString = file + " ; " + sMergeString;
}
} catch (IOException e) {
// TODO 自動生成された catch ブロック
e.printStackTrace();
}
WebView oWebView = new WebView(getApplicationContext());
//文字列をhtml形式で出力する
oWebView.loadData( sMergeString , "text/html", null);
setContentView(oWebView);
}
}
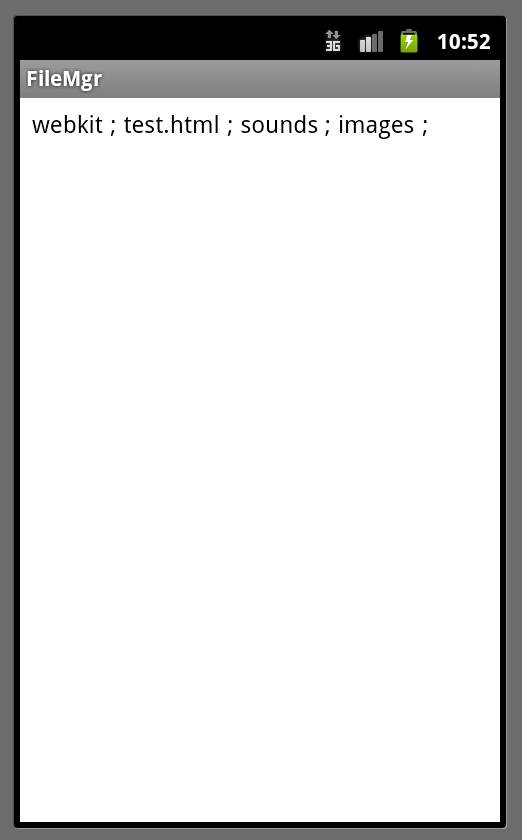
このソースは何??
→assetsフォルダの直下にあるファイル一覧を表示しています。
細かいソースの説明は省略しますが、
先ほど作成した、「test.html」
以外にもいくつかのファイルが存在することを確認できると思います。
まぁ、何を言いたいかというと、今回は「assets」直下にファイルを置きましたが、
ちゃんとしたものを作る際には、「assets」のしたにもう一階層作って、
そのフォルダ内にファイルを配置しましょう!!
iPhoneは規約のせいで、編集できないローカルにもたなければいけないファイルが
ありますが、Androidには特にありません。。
なので、あまり使う機会はないと思いますが、
ローカルでファイルを管理する時に必要だと思うので、覚えておいて損はないです。
■ローカルファイルの配置
【プロジェクト名で右クリック】→【新規】→【ソース・フォルダ】→assetsという名のフォルダ作成
■ローカルファイルの配置
適当なテキストエディタを開き
<html xmlns="http://www.w3.org/1999/xhtml" xml: lang="ja">
<body>
<p>Hello World!!</p>
</body>
</html>
↑をコピって貼り付ける
「test.html」として保存
「test.html」をassetsフォルダにドラッグ
■サンプルソース
package com.example.filemgr;
import android.os.Bundle;
import android.app.Activity;
import android.webkit.WebView;
public class MainActivity extends Activity {
@Override
protected void onCreate(Bundle savedInstanceState) {
super.onCreate(savedInstanceState);
WebView oWebView = new WebView(getApplicationContext());
oWebView.loadUrl( "file:///android_asset/test.html" );
setContentView(oWebView);
}
}
■実行結果
こんな感じで完了です。
■おまけ
package com.example.filemgr;
import java.io.IOException;
import android.os.Bundle;
import android.app.Activity;
import android.webkit.WebView;
public class MainActivity extends Activity {
@Override
protected void onCreate(Bundle savedInstanceState) {
super.onCreate(savedInstanceState);
//assets直下のファイルを一覧で表示
String sMergeString = "";
try {
//assetsフォルダ直下に何があるかを表示
String[] sFileList = getAssets().list("");
//ファイル一覧を取得
for(String file : sFileList){
sMergeString = file + " ; " + sMergeString;
}
} catch (IOException e) {
// TODO 自動生成された catch ブロック
e.printStackTrace();
}
WebView oWebView = new WebView(getApplicationContext());
//文字列をhtml形式で出力する
oWebView.loadData( sMergeString , "text/html", null);
setContentView(oWebView);
}
}
■実行結果
このソースは何??
→assetsフォルダの直下にあるファイル一覧を表示しています。
細かいソースの説明は省略しますが、
先ほど作成した、「test.html」
以外にもいくつかのファイルが存在することを確認できると思います。
まぁ、何を言いたいかというと、今回は「assets」直下にファイルを置きましたが、
ちゃんとしたものを作る際には、「assets」のしたにもう一階層作って、
そのフォルダ内にファイルを配置しましょう!!
AndrdoiMainifest.xml-02 (タイトルとホーム画面でのアプリ名の設定)
ホーム画面上のアプリ名の変更もAndroidManifest.xmlで
行います。
<?xml version="1.0" encoding="utf-8"?>
<manifest xmlns:android="http://schemas.android.com/apk/res/android"
package="co.jp.test.manifest.xml"
android:versionCode="1"
android:versionName="1.0" >
<uses-sdk
android:minSdkVersion="8"
android:targetSdkVersion="17" />
<application
android:allowBackup="true"
android:icon="@drawable/ic_launcher"
android:label="これがラベル値だ"
android:theme="@style/AppTheme" >
<activity
android:name="co.jp.test.manifest.xml.MainActivity"
android:label="activityのラベル" >
<intent-filter>
<action android:name="android.intent.action.MAIN" />
<category android:name="android.intent.category.LAUNCHER" />
</intent-filter>
</activity>
</application>
</manifest>
■実行結果


こんな実行結果になりました。
起動するActivtyのタイトルがホーム画面のアプリ名と一致することが、
上の2枚の画像から、わかると思います。
また、「設定画面」→「アプリケーション」の画面で確認できるのが
applicationタグで設定したラベル名となります。
ホーム画面のアプリ名と起動するActivityのラベル名を変更したいときはどうすればいいのでしょか??
教えて偉い人!!
行います。
<?xml version="1.0" encoding="utf-8"?>
<manifest xmlns:android="http://schemas.android.com/apk/res/android"
package="co.jp.test.manifest.xml"
android:versionCode="1"
android:versionName="1.0" >
<uses-sdk
android:minSdkVersion="8"
android:targetSdkVersion="17" />
<application
android:allowBackup="true"
android:icon="@drawable/ic_launcher"
android:label="これがラベル値だ"
android:theme="@style/AppTheme" >
<activity
android:name="co.jp.test.manifest.xml.MainActivity"
android:label="activityのラベル" >
<intent-filter>
<action android:name="android.intent.action.MAIN" />
<category android:name="android.intent.category.LAUNCHER" />
</intent-filter>
</activity>
</application>
</manifest>
■実行結果
こんな実行結果になりました。
起動するActivtyのタイトルがホーム画面のアプリ名と一致することが、
上の2枚の画像から、わかると思います。
また、「設定画面」→「アプリケーション」の画面で確認できるのが
applicationタグで設定したラベル名となります。
ホーム画面のアプリ名と起動するActivityのラベル名を変更したいときはどうすればいいのでしょか??
教えて偉い人!!
2014年1月24日金曜日
エラー(APK は 'aapt dump badging' では解析できませんでした。エラー出力:)
Failed to run aapt dump badging:
アップロードできませんでした
APK は 'aapt dump badging' では解析できませんでした。エラー出力:
Failed to run aapt dump badging:
ERROR getting 'name' attribute: attribute is not a string value
DeveloperConsoleにアプリをアップロードする際に上記のエラーがでました。
ググったのですが、全然解決方法がわかりませんでした。
Manifest.xmlの
パッケージ名の指定が間違っているところがあり、
こんなエラーがでていたようです。
ちゃんと、指定したら問題ありませんでした。
逆に何で今まで動いてたんだろう??
2014年1月6日月曜日
エラー where item tag is expected
xmlファイルの編集中に
縲��" where item tag is expected
こんなエラーがでて、はまった。
調べてもよくわからなったが、何か英語のサイトによると
スペースを消すといいらしい。
コピった部分のスペースを消したら、
エラーが出なくなった。
縲��" where item tag is expected
こんなエラーがでて、はまった。
調べてもよくわからなったが、何か英語のサイトによると
スペースを消すといいらしい。
コピった部分のスペースを消したら、
エラーが出なくなった。
2013年12月7日土曜日
Android開発環境のインストール(adt-bundle-windows, a java runtime environment (jre) or Java Development kit (JDK), fail to load the jni shared library)
PCを乗り換えたので、再度Android開発環境を構築してみたので、インストール方法等を紹介します。


今まで、プログラミング経験がない人のためにも、あんまり専門用語は使わずに書いていきます。
とりあえず
https://developer.android.com/sdk/index.html
画面に飛びます。
download sdk クリック

ギガ超えしているので、落とすのに結構時間がかかるかもしれません。。
落とし終えたら、解凍してくだいさい。
zipを右クリック展開でOKです。
そして、解凍したフォルダに行き、『eclipse』→『eclipse.exe』を叩いてください。
Android Developer Toolという画面が立ち上がったら、成功です。
これでひとまず終了

こんな感じのダイアログがでた人は次の作業
JREとJDKを落とします。
JRE
http://java.com/ja/download/
ダウンロード
インストール
JDK
http://www.oracle.com/jp/downloads/index.html
ダウンロード
インストール
そして、環境pathの設定
コントロール パネル\システムとセキュリティ\システム→システムの詳細設定→詳細設定→環境変数→システム環境変数のPathを選択編集,現在書かれていpathの最後に
;を付け加えてjdkのbinまでを記述
C:\Program Files\Java\jdk1.6.0_29\bin
こんな感じ
でもう一回
『eclipse』→『eclipse.exe』を叩いてください。
上手く言った人は終了!!

こんなのが出現した人は失敗
JDKの×64とか×32のインストールを間違えているので、正しい数字でインストールしてください。
以上です。
2013年12月2日月曜日
タブの表示(ActionBar.TabListener, FragmentActivity, TabActivity)
TabActivityが非推奨になったことを最近しりました。。。
結構便利で使っていたのですが。。。
しかし、もっと便利でかっこいいタブを見つけたので紹介します。
actionBar.setNavigationMode(ActionBar.NAVIGATION_MODE_TABS);
アクションバーのNAVIGATION_MODE_TABSです。
iPhoneアプリで言うところのUINavigationControllerみたいなものです。
PagerAdapterを使うことによって、スワイプ操作で画面の切り替えができるので
スマホっぽさを演出できます。
使い方は簡単
Androidアプリの新規プロジェクトを作成して、
最低APIのバージョンを11以上にしてください。

この画面でナビゲーションタイプを 『Tabs + Swipe』にすれば完了!!
てか、今まで自分こんな便利なものがあると知らなかった!!
他のもいろいろ試したくなります。
で、作成されたソースを実行すると、
それっぽい感じの画面ができてます。
ということで、
ActionBar.TabListener, TabActivityの使い方は多分だいたいOKだと思いますが、
一応このブログではできるだけ、xmlファイルを使用しないでソースで作成するということなので、
少しだけ、手を加えたサンプルソースを載せます。
まぁ、ほとんどサンプルどおりですが。。。
■サンプルソース
package com.example.tabtest;
import android.app.ActionBar;
import android.app.FragmentTransaction;
import android.os.Bundle;
import android.support.v4.app.Fragment;
import android.support.v4.app.FragmentActivity;
import android.support.v4.app.FragmentManager;
import android.support.v4.app.FragmentPagerAdapter;
import android.support.v4.view.ViewPager;
import android.view.Gravity;
import android.view.LayoutInflater;
import android.view.View;
import android.view.ViewGroup;
import android.widget.TextView;
public class MainActivity extends FragmentActivity implements ActionBar.TabListener {
/**
* The {@link android.support.v4.view.PagerAdapter} that will provide
* fragments for each of the sections. We use a
* {@link android.support.v4.app.FragmentPagerAdapter} derivative, which
* will keep every loaded fragment in memory. If this becomes too memory
* intensive, it may be best to switch to a
* {@link android.support.v4.app.FragmentStatePagerAdapter}.
*/
SectionsPagerAdapter mSectionsPagerAdapter;
/**
* The {@link ViewPager} that will host the section contents.
*/
ViewPager mViewPager;
@Override
protected void onCreate(Bundle savedInstanceState) {
super.onCreate(savedInstanceState);
// Set up the action bar.
final ActionBar actionBar = getActionBar();
actionBar.setNavigationMode(ActionBar.NAVIGATION_MODE_TABS);
// Create the adapter that will return a fragment for each of the three
// primary sections of the app.
mSectionsPagerAdapter = new SectionsPagerAdapter(getSupportFragmentManager());
// Set up the ViewPager with the sections adapter.
mViewPager = new ViewPager(getApplicationContext());
mViewPager.setId(2);
mViewPager.setAdapter(mSectionsPagerAdapter);
setContentView(mViewPager);
// When swiping between different sections, select the corresponding
// tab. We can also use ActionBar.Tab#select() to do this if we have
// a reference to the Tab.
mViewPager.setOnPageChangeListener(new ViewPager.SimpleOnPageChangeListener() {
@Override
public void onPageSelected(int position) {
actionBar.setSelectedNavigationItem(position);
}
});
// For each of the sections in the app, add a tab to the action bar.
for (int i = 0; i < mSectionsPagerAdapter.getCount(); i++) {
// Create a tab with text corresponding to the page title defined by
// the adapter. Also specify this Activity object, which implements
// the TabListener interface, as the callback (listener) for when
// this tab is selected.
//アクションバーにタブを設定する
actionBar.addTab(actionBar.newTab()
//タブタイトルの設定
.setText(mSectionsPagerAdapter.getPageTitle(i))
//リスナーの設定(スワイプ操作を受け付ける)
.setTabListener(this)
//アイコンの設定
setIcon(R.drawable.ic_launcher));
}
}
@Override
public void onTabSelected(ActionBar.Tab tab, FragmentTransaction fragmentTransaction) {
// When the given tab is selected, switch to the corresponding page in
// the ViewPager.
mViewPager.setCurrentItem(tab.getPosition());
}
@Override
public void onTabUnselected(ActionBar.Tab tab,
FragmentTransaction fragmentTransaction) {
}
@Override
public void onTabReselected(ActionBar.Tab tab,
FragmentTransaction fragmentTransaction) {
}
/**
* A {@link FragmentPagerAdapter} that returns a fragment corresponding to
* one of the sections/tabs/pages.
*/
public class SectionsPagerAdapter extends FragmentPagerAdapter {
public SectionsPagerAdapter(FragmentManager fm) {
super(fm);
}
@Override
public Fragment getItem(int position) {
Fragment fragment = new DummySectionFragment();
Bundle args = new Bundle();
args.putInt(DummySectionFragment.ARG_SECTION_NUMBER, position + 1);
fragment.setArguments(args);
return fragment;
}
@Override
public int getCount() {
// Show 3 total pages.
return 3;
}
@Override
public CharSequence getPageTitle(int position) {
switch (position) {
case 0:
return "1";
case 1:
return "2";
case 2:
return "3";
}
return null;
}
}
/**
* A dummy fragment representing a section of the app, but that simply
* displays dummy text.
*/
public static class DummySectionFragment extends Fragment {
/**
* The fragment argument representing the section number for this
* fragment.
*/
public static final String ARG_SECTION_NUMBER = "section_number";
public DummySectionFragment() {
}
@Override
public View onCreateView(LayoutInflater inflater, ViewGroup container, Bundle savedInstanceState) {
// Create a new TextView and set its text to the fragment's section
// number argument value.
TextView textView = new TextView(getActivity());
textView.setGravity(Gravity.CENTER);
textView.setText(Integer.toString( getArguments().getInt(ARG_SECTION_NUMBER)));
return textView;
}
}
}
■実行結果

こんな感じになります。
mViewPager = new ViewPager(getApplicationContext());
mViewPager.setId(2);
このViewPagerを作成するところが肝でした。
なぜかって??
setIdをしないと実行エラーになるからです。
あまり普段、id指定をしていなかったので、
結構ハマりました。。。。。。
mViewPager.setId(2);
このViewPagerを作成するところが肝でした。
なぜかって??
setIdをしないと実行エラーになるからです。
あまり普段、id指定をしていなかったので、
結構ハマりました。。。。。。
2013年11月28日木曜日
アプリ内課金実装(IInAppBillingService.aidl, IabException)
IInAppBillingServiceのライブラリを実装しました。
前回までのIMarketBillingService.aidlを使っていたのですが、
version3にアップデートしろと言われ仕方なくアップデート。。
アップデートした感想を先にいうと、
全体的に便利になっています。
前回は自分で準備した処理も
既に入っていたりと。。
IInAppBillingServiceを使っている人は今すぐにでも
アップデートしていいレベルだど思います。
また、新機能として、consumeという機能が付きました。
購入した商品を消費するという処理です。
この消費が正常に行われないと、ユーザーは商品を購入できません。
購入した商品はちゃんと、consumeの処理を走らせて、商品を消費させてください。
ではでは、課金機能を新規追加の人のためにも実装方法を説明します。
他のサイトでも書かれていると思いますが、サンプルソースを見ながら、自分のアプリに必要な
ソースをコピって、貼り付けてね。
とそんな感じになるんですが。。。。
■サンプルの取得
Android SDKマネージャーを立ち上げ。
play_billingをインストール

eclipseでplay_billingをインポート
■サンプルソースを見る前に覚えておくといい事
◇商品タイプ
Googleのアプリ内課金で購入できるアイテムには3つのタイプがあります。
(アイテム登録時に分ける必要あり)
・管理対象の商品
・管理対象外の商品
・定期購入
定期購入は何となくわかると思いますが、管理対象の商品と管理対象外の商品違いとは何か??
管理対象のアイテムは1度しか購入できない商品で、
管理対象外のアイテムは何度も購入できる商品の事です。
RPGで言うと、回復アイテムは管理対象外のアイテムで
鍵は管理対象のアイテムです。
何となくわかりますかね??
今回のgoogleのサンプルソースで言うと、
gasが管理対象外の商品
premiumが管理対象の商品
infinite_gasが定期購読
になります。
◇商品購入テストの仕方
パッケージ名がcom.exampleから、始まると購入テストはできません。
googleplayに実際にアプリを上げないとテストはできません。(アプリは非公開で)
また、googleplayにあげるので、本番で使う証明書でBuildするのがお勧めです。
developer consoleのアカウントの詳細でテスト用のアクセス権を設定すれば、テスト購入ができます。
ただ、そのテスト用のアクセス権を設定する際にテスト用に使いたい端末の初期設定時の
Gmailアドレスを設定しないといけないので注意して下さい。下手すると、端末を初期化しないといけなくなります。
■サンプルソースをよく読む
MainActivityがメイン処理です。
課金機能の流れとしては、
消費していないアイテムがあるかの確認
↓
アイテムの購入
↓
アイテムの消費
という風になっております。
■サンプルを見ても自分のアプリに必要なソースがわからない人のために
ちょっと、コメントアウトを噛みくだいて、MainActivitywを記述して見ました。
//デバック用のログタイトル
static final String TAG = "TrivialDrive";
//管理されているアイテムを購入しているかのフラグ
boolean mIsPremium = false;
//定期購読アイテムを購入しているかのフラグ
boolean mSubscribedToInfiniteGas = false;
//developer consoleページ内のアプリ内アイテムで登録されているアイテムID
//premiumは管理対象のアイテム
//gasは管理対象外のアイテム
//infinite_gasは定期購読商品のアイテム
static final String SKU_PREMIUM = "premium";
static final String SKU_GAS = "gas";
static final String SKU_INFINITE_GAS = "infinite_gas";
//onActivityResultで返ってくるときのrequest_code
static final int RC_REQUEST = 10001;
//画像配列
static int[] TANK_RES_IDS = { R.drawable.gas0, R.drawable.gas1, R.drawable.gas2,
R.drawable.gas3, R.drawable.gas4 };
//管理対象外アイテムの購入可能回数
static final int TANK_MAX = 4;
//管理対象外アイテムの購入回数
int mTank;
//IabHelperオブジェクト
IabHelper mHelper;
@Override
public void onCreate(Bundle savedInstanceState) {
super.onCreate(savedInstanceState);
//画面を設定
setContentView(R.layout.activity_main);
//ゲーム内容のロード
loadData();
//このアプリのライセンス キー 。バイナリに追加する Base64 エンコードの RSA 公開鍵
String base64EncodedPublicKey = "CONSTRUCT_YOUR_KEY_AND_PLACE_IT_HERE";
//base64EncodedPublicKeyの変数をアプリライセンスキーに変更したかの判定
if (base64EncodedPublicKey.contains("CONSTRUCT_YOUR")) {
throw new RuntimeException("Please put your app's public key in MainActivity.java. See README.");
}
//パッケージ名がcom.exampleから、始まっていないかの判定(com.exampleのままだと購入テストはできません)
if (getPackageName().startsWith("com.example")) {
throw new RuntimeException("Please change the sample's package name! See README.");
}
//IabHelperオブジェクトの生成
Log.d(TAG, "Creating IAB helper.");
mHelper = new IabHelper(this, base64EncodedPublicKey);
//ログ出力フラグをONにする
mHelper.enableDebugLogging(true);
//IabHelperのインスタンスの呼び出し
//IabHelperが使用可能か非同期で通信して、通信完了後に呼ばれる
Log.d(TAG, "Starting setup.");
mHelper.startSetup(new IabHelper.OnIabSetupFinishedListener() {
public void onIabSetupFinished(IabResult result) {
Log.d(TAG, "Setup finished.");
//IabHelperが使用不能なときに通る
if (!result.isSuccess()) {
complain("Problem setting up in-app billing: " + result);
return;
}
// Have we been disposed of in the meantime? If so, quit.
if (mHelper == null) return;
//アイテム購入復元処理を実行(消費していないアイテムがあるかの判定処理が走る)
Log.d(TAG, "Setup successful. Querying inventory.");
mHelper.queryInventoryAsync(mGotInventoryListener);
}
});
}
//消費してしないアイテムを判定完了時に呼ばれる
IabHelper.QueryInventoryFinishedListener mGotInventoryListener = new IabHelper.QueryInventoryFinishedListener() {
public void onQueryInventoryFinished(IabResult result, Inventory inventory) {
Log.d(TAG, "Query inventory finished.");
// Have we been disposed of in the meantime? If so, quit.
if (mHelper == null) return;
//購入が成功しているかの判定。購入画面から、購入しないで戻ってもここを通る
if (result.isFailure()) {
complain("Failed to query inventory: " + result);
return;
}
Log.d(TAG, "Query inventory was successful.");
/*
* Check for items we own. Notice that for each purchase, we check
* the developer payload to see if it's correct! See
* verifyDeveloperPayload().
*/
//管理対象のアイテム購入履歴があるかの判定
Purchase premiumPurchase = inventory.getPurchase(SKU_PREMIUM);
mIsPremium = (premiumPurchase != null && verifyDeveloperPayload(premiumPurchase));
Log.d(TAG, "User is " + (mIsPremium ? "PREMIUM" : "NOT PREMIUM"));
//定期購読アイテム購入履歴があるかの判定
Purchase infiniteGasPurchase = inventory.getPurchase(SKU_INFINITE_GAS);
mSubscribedToInfiniteGas = (infiniteGasPurchase != null &&
verifyDeveloperPayload(infiniteGasPurchase));
Log.d(TAG, "User " + (mSubscribedToInfiniteGas ? "HAS" : "DOES NOT HAVE")
+ " infinite gas subscription.");
if (mSubscribedToInfiniteGas) mTank = TANK_MAX;
//消費されていない管理対象外のアイテムがあるかの判定
Purchase gasPurchase = inventory.getPurchase(SKU_GAS);
if (gasPurchase != null && verifyDeveloperPayload(gasPurchase)) {
Log.d(TAG, "We have gas. Consuming it.");
mHelper.consumeAsync(inventory.getPurchase(SKU_GAS), mConsumeFinishedListener);
return;
}
updateUi();
setWaitScreen(false);
Log.d(TAG, "Initial inventory query finished; enabling main UI.");
}
};
//管理対象外アイテム購入ボタン押下時
public void onBuyGasButtonClicked(View arg0) {
Log.d(TAG, "Buy gas button clicked.");
//定期購読アイテム購入していたら、処理を抜ける
if (mSubscribedToInfiniteGas) {
complain("No need! You're subscribed to infinite gas. Isn't that awesome?");
return;
}
//管理対象外アイテムの購入限度を超えていたら、処理を抜ける
if (mTank >= TANK_MAX) {
complain("Your tank is full. Drive around a bit!");
return;
}
//Viewを購入画面に変更(これは地味に重要!!仕込むアプリにも是非導入しよう)
setWaitScreen(true);
Log.d(TAG, "Launching purchase flow for gas.");
/* TODO: for security, generate your payload here for verification. See the comments on
* verifyDeveloperPayload() for more info. Since this is a SAMPLE, we just use
* an empty string, but on a production app you should carefully generate this. */
String payload = "";
//アイテム購入フローが走る
mHelper.launchPurchaseFlow(this, SKU_GAS, RC_REQUEST,
mPurchaseFinishedListener, payload);
}
//管理対象アイテム購入ボタン押下時
public void onUpgradeAppButtonClicked(View arg0) {
Log.d(TAG, "Upgrade button clicked; launching purchase flow for upgrade.");
setWaitScreen(true);
/* TODO: for security, generate your payload here for verification. See the comments on
* verifyDeveloperPayload() for more info. Since this is a SAMPLE, we just use
* an empty string, but on a production app you should carefully generate this. */
String payload = "";
mHelper.launchPurchaseFlow(this, SKU_PREMIUM, RC_REQUEST,
mPurchaseFinishedListener, payload);
}
//定期購読商品を購入する時に流れる
public void onInfiniteGasButtonClicked(View arg0) {
if (!mHelper.subscriptionsSupported()) {
complain("Subscriptions not supported on your device yet. Sorry!");
return;
}
String payload = "";
setWaitScreen(true);
Log.d(TAG, "Launching purchase flow for infinite gas subscription.");
//定期購読用の引数を渡すので注意
mHelper.launchPurchaseFlow(this, SKU_INFINITE_GAS, IabHelper.ITEM_TYPE_SUBS,
RC_REQUEST, mPurchaseFinishedListener, payload);
}
前回までのIMarketBillingService.aidlを使っていたのですが、
version3にアップデートしろと言われ仕方なくアップデート。。
アップデートした感想を先にいうと、
全体的に便利になっています。
前回は自分で準備した処理も
既に入っていたりと。。
IInAppBillingServiceを使っている人は今すぐにでも
アップデートしていいレベルだど思います。
また、新機能として、consumeという機能が付きました。
購入した商品を消費するという処理です。
この消費が正常に行われないと、ユーザーは商品を購入できません。
購入した商品はちゃんと、consumeの処理を走らせて、商品を消費させてください。
ではでは、課金機能を新規追加の人のためにも実装方法を説明します。
他のサイトでも書かれていると思いますが、サンプルソースを見ながら、自分のアプリに必要な
ソースをコピって、貼り付けてね。
とそんな感じになるんですが。。。。
■サンプルの取得
Android SDKマネージャーを立ち上げ。
play_billingをインストール
eclipseでplay_billingをインポート
■サンプルソースを見る前に覚えておくといい事
◇商品タイプ
Googleのアプリ内課金で購入できるアイテムには3つのタイプがあります。
(アイテム登録時に分ける必要あり)
・管理対象の商品
・管理対象外の商品
・定期購入
定期購入は何となくわかると思いますが、管理対象の商品と管理対象外の商品違いとは何か??
管理対象のアイテムは1度しか購入できない商品で、
管理対象外のアイテムは何度も購入できる商品の事です。
RPGで言うと、回復アイテムは管理対象外のアイテムで
鍵は管理対象のアイテムです。
何となくわかりますかね??
今回のgoogleのサンプルソースで言うと、
gasが管理対象外の商品
premiumが管理対象の商品
infinite_gasが定期購読
になります。
◇商品購入テストの仕方
パッケージ名がcom.exampleから、始まると購入テストはできません。
googleplayに実際にアプリを上げないとテストはできません。(アプリは非公開で)
また、googleplayにあげるので、本番で使う証明書でBuildするのがお勧めです。
developer consoleのアカウントの詳細でテスト用のアクセス権を設定すれば、テスト購入ができます。
ただ、そのテスト用のアクセス権を設定する際にテスト用に使いたい端末の初期設定時の
Gmailアドレスを設定しないといけないので注意して下さい。下手すると、端末を初期化しないといけなくなります。
■サンプルソースをよく読む
MainActivityがメイン処理です。
課金機能の流れとしては、
消費していないアイテムがあるかの確認
↓
アイテムの購入
↓
アイテムの消費
という風になっております。
■サンプルを見ても自分のアプリに必要なソースがわからない人のために
ちょっと、コメントアウトを噛みくだいて、MainActivitywを記述して見ました。
◇サンプルのサンプル
public class MainActivity extends Activity {//デバック用のログタイトル
static final String TAG = "TrivialDrive";
//管理されているアイテムを購入しているかのフラグ
boolean mIsPremium = false;
//定期購読アイテムを購入しているかのフラグ
boolean mSubscribedToInfiniteGas = false;
//developer consoleページ内のアプリ内アイテムで登録されているアイテムID
//premiumは管理対象のアイテム
//gasは管理対象外のアイテム
//infinite_gasは定期購読商品のアイテム
static final String SKU_PREMIUM = "premium";
static final String SKU_GAS = "gas";
static final String SKU_INFINITE_GAS = "infinite_gas";
//onActivityResultで返ってくるときのrequest_code
static final int RC_REQUEST = 10001;
//画像配列
static int[] TANK_RES_IDS = { R.drawable.gas0, R.drawable.gas1, R.drawable.gas2,
R.drawable.gas3, R.drawable.gas4 };
//管理対象外アイテムの購入可能回数
static final int TANK_MAX = 4;
//管理対象外アイテムの購入回数
int mTank;
//IabHelperオブジェクト
IabHelper mHelper;
@Override
public void onCreate(Bundle savedInstanceState) {
super.onCreate(savedInstanceState);
//画面を設定
setContentView(R.layout.activity_main);
//ゲーム内容のロード
loadData();
//このアプリのライセンス キー 。バイナリに追加する Base64 エンコードの RSA 公開鍵
String base64EncodedPublicKey = "CONSTRUCT_YOUR_KEY_AND_PLACE_IT_HERE";
//base64EncodedPublicKeyの変数をアプリライセンスキーに変更したかの判定
if (base64EncodedPublicKey.contains("CONSTRUCT_YOUR")) {
throw new RuntimeException("Please put your app's public key in MainActivity.java. See README.");
}
//パッケージ名がcom.exampleから、始まっていないかの判定(com.exampleのままだと購入テストはできません)
if (getPackageName().startsWith("com.example")) {
throw new RuntimeException("Please change the sample's package name! See README.");
}
//IabHelperオブジェクトの生成
Log.d(TAG, "Creating IAB helper.");
mHelper = new IabHelper(this, base64EncodedPublicKey);
//ログ出力フラグをONにする
mHelper.enableDebugLogging(true);
//IabHelperのインスタンスの呼び出し
//IabHelperが使用可能か非同期で通信して、通信完了後に呼ばれる
Log.d(TAG, "Starting setup.");
mHelper.startSetup(new IabHelper.OnIabSetupFinishedListener() {
public void onIabSetupFinished(IabResult result) {
Log.d(TAG, "Setup finished.");
//IabHelperが使用不能なときに通る
if (!result.isSuccess()) {
complain("Problem setting up in-app billing: " + result);
return;
}
// Have we been disposed of in the meantime? If so, quit.
if (mHelper == null) return;
//アイテム購入復元処理を実行(消費していないアイテムがあるかの判定処理が走る)
Log.d(TAG, "Setup successful. Querying inventory.");
mHelper.queryInventoryAsync(mGotInventoryListener);
}
});
}
//消費してしないアイテムを判定完了時に呼ばれる
IabHelper.QueryInventoryFinishedListener mGotInventoryListener = new IabHelper.QueryInventoryFinishedListener() {
public void onQueryInventoryFinished(IabResult result, Inventory inventory) {
Log.d(TAG, "Query inventory finished.");
// Have we been disposed of in the meantime? If so, quit.
if (mHelper == null) return;
//購入が成功しているかの判定。購入画面から、購入しないで戻ってもここを通る
if (result.isFailure()) {
complain("Failed to query inventory: " + result);
return;
}
Log.d(TAG, "Query inventory was successful.");
/*
* Check for items we own. Notice that for each purchase, we check
* the developer payload to see if it's correct! See
* verifyDeveloperPayload().
*/
//管理対象のアイテム購入履歴があるかの判定
Purchase premiumPurchase = inventory.getPurchase(SKU_PREMIUM);
mIsPremium = (premiumPurchase != null && verifyDeveloperPayload(premiumPurchase));
Log.d(TAG, "User is " + (mIsPremium ? "PREMIUM" : "NOT PREMIUM"));
//定期購読アイテム購入履歴があるかの判定
Purchase infiniteGasPurchase = inventory.getPurchase(SKU_INFINITE_GAS);
mSubscribedToInfiniteGas = (infiniteGasPurchase != null &&
verifyDeveloperPayload(infiniteGasPurchase));
Log.d(TAG, "User " + (mSubscribedToInfiniteGas ? "HAS" : "DOES NOT HAVE")
+ " infinite gas subscription.");
if (mSubscribedToInfiniteGas) mTank = TANK_MAX;
//消費されていない管理対象外のアイテムがあるかの判定
Purchase gasPurchase = inventory.getPurchase(SKU_GAS);
if (gasPurchase != null && verifyDeveloperPayload(gasPurchase)) {
Log.d(TAG, "We have gas. Consuming it.");
mHelper.consumeAsync(inventory.getPurchase(SKU_GAS), mConsumeFinishedListener);
return;
}
updateUi();
setWaitScreen(false);
Log.d(TAG, "Initial inventory query finished; enabling main UI.");
}
};
//管理対象外アイテム購入ボタン押下時
public void onBuyGasButtonClicked(View arg0) {
Log.d(TAG, "Buy gas button clicked.");
//定期購読アイテム購入していたら、処理を抜ける
if (mSubscribedToInfiniteGas) {
complain("No need! You're subscribed to infinite gas. Isn't that awesome?");
return;
}
//管理対象外アイテムの購入限度を超えていたら、処理を抜ける
if (mTank >= TANK_MAX) {
complain("Your tank is full. Drive around a bit!");
return;
}
//Viewを購入画面に変更(これは地味に重要!!仕込むアプリにも是非導入しよう)
setWaitScreen(true);
Log.d(TAG, "Launching purchase flow for gas.");
/* TODO: for security, generate your payload here for verification. See the comments on
* verifyDeveloperPayload() for more info. Since this is a SAMPLE, we just use
* an empty string, but on a production app you should carefully generate this. */
String payload = "";
//アイテム購入フローが走る
mHelper.launchPurchaseFlow(this, SKU_GAS, RC_REQUEST,
mPurchaseFinishedListener, payload);
}
//管理対象アイテム購入ボタン押下時
public void onUpgradeAppButtonClicked(View arg0) {
Log.d(TAG, "Upgrade button clicked; launching purchase flow for upgrade.");
setWaitScreen(true);
/* TODO: for security, generate your payload here for verification. See the comments on
* verifyDeveloperPayload() for more info. Since this is a SAMPLE, we just use
* an empty string, but on a production app you should carefully generate this. */
String payload = "";
mHelper.launchPurchaseFlow(this, SKU_PREMIUM, RC_REQUEST,
mPurchaseFinishedListener, payload);
}
//定期購読商品を購入する時に流れる
public void onInfiniteGasButtonClicked(View arg0) {
if (!mHelper.subscriptionsSupported()) {
complain("Subscriptions not supported on your device yet. Sorry!");
return;
}
String payload = "";
setWaitScreen(true);
Log.d(TAG, "Launching purchase flow for infinite gas subscription.");
//定期購読用の引数を渡すので注意
mHelper.launchPurchaseFlow(this, SKU_INFINITE_GAS, IabHelper.ITEM_TYPE_SUBS,
RC_REQUEST, mPurchaseFinishedListener, payload);
}
boolean verifyDeveloperPayload(Purchase p) {
String payload = p.getDeveloperPayload();
return true;
}
//購入フロー完了時に呼ばれる
IabHelper.OnIabPurchaseFinishedListener mPurchaseFinishedListener = new IabHelper.OnIabPurchaseFinishedListener() {
public void onIabPurchaseFinished(IabResult result, Purchase purchase) {
Log.d(TAG, "Purchase finished: " + result + ", purchase: " + purchase);
// if we were disposed of in the meantime, quit.
if (mHelper == null) return;
if (result.isFailure()) {
complain("Error purchasing: " + result);
setWaitScreen(false);
return;
}
if (!verifyDeveloperPayload(purchase)) {
complain("Error purchasing. Authenticity verification failed.");
setWaitScreen(false);
return;
}
Log.d(TAG, "Purchase successful.");
if (purchase.getSku().equals(SKU_GAS)) {
// bought 1/4 tank of gas. So consume it.
Log.d(TAG, "Purchase is gas. Starting gas consumption.");
//購入アイテムの消費フローが走る
mHelper.consumeAsync(purchase, mConsumeFinishedListener);
}
else if (purchase.getSku().equals(SKU_PREMIUM)) {
// bought the premium upgrade!
Log.d(TAG, "Purchase is premium upgrade. Congratulating user.");
alert("Thank you for upgrading to premium!");
mIsPremium = true;
updateUi();
setWaitScreen(false);
}
else if (purchase.getSku().equals(SKU_INFINITE_GAS)) {
// bought the infinite gas subscription
Log.d(TAG, "Infinite gas subscription purchased.");
alert("Thank you for subscribing to infinite gas!");
mSubscribedToInfiniteGas = true;
mTank = TANK_MAX;
updateUi();
setWaitScreen(false);
}
}
};
//購入したアイテムの消費に完了した時に呼ばれる
IabHelper.OnConsumeFinishedListener mConsumeFinishedListener = new IabHelper.OnConsumeFinishedListener() {
public void onConsumeFinished(Purchase purchase, IabResult result) {
Log.d(TAG, "Consumption finished. Purchase: " + purchase + ", result: " + result);
// if we were disposed of in the meantime, quit.
if (mHelper == null) return;
// We know this is the "gas" sku because it's the only one we consume,
// so we don't check which sku was consumed. If you have more than one
// sku, you probably should check...
if (result.isSuccess()) {
// successfully consumed, so we apply the effects of the item in our
// game world's logic, which in our case means filling the gas tank a bit
Log.d(TAG, "Consumption successful. Provisioning.");
mTank = mTank == TANK_MAX ? TANK_MAX : mTank + 1;
saveData();
alert("You filled 1/4 tank. Your tank is now " + String.valueOf(mTank) + "/4 full!");
}
else {
complain("Error while consuming: " + result);
}
updateUi();
setWaitScreen(false);
Log.d(TAG, "End consumption flow.");
}
};
// Drive button clicked. Burn gas!
public void onDriveButtonClicked(View arg0) {
Log.d(TAG, "Drive button clicked.");
if (!mSubscribedToInfiniteGas && mTank <= 0) alert("Oh, no! You are out of gas! Try buying some!");
else {
if (!mSubscribedToInfiniteGas) --mTank;
saveData();
alert("Vroooom, you drove a few miles.");
updateUi();
Log.d(TAG, "Vrooom. Tank is now " + mTank);
}
}
// We're being destroyed. It's important to dispose of the helper here!
@Override
public void onDestroy() {
super.onDestroy();
// very important:
Log.d(TAG, "Destroying helper.");
if (mHelper != null) {
mHelper.dispose();
mHelper = null;
}
}
// updates UI to reflect model
public void updateUi() {
// update the car color to reflect premium status or lack thereof
((ImageView)findViewById(R.id.free_or_premium)).setImageResource(mIsPremium ? R.drawable.premium : R.drawable.free);
// "Upgrade" button is only visible if the user is not premium
findViewById(R.id.upgrade_button).setVisibility(mIsPremium ? View.GONE : View.VISIBLE);
// "Get infinite gas" button is only visible if the user is not subscribed yet
findViewById(R.id.infinite_gas_button).setVisibility(mSubscribedToInfiniteGas ?
View.GONE : View.VISIBLE);
// update gas gauge to reflect tank status
if (mSubscribedToInfiniteGas) {
((ImageView)findViewById(R.id.gas_gauge)).setImageResource(R.drawable.gas_inf);
}
else {
int index = mTank >= TANK_RES_IDS.length ? TANK_RES_IDS.length - 1 : mTank;
((ImageView)findViewById(R.id.gas_gauge)).setImageResource(TANK_RES_IDS[index]);
}
}
// Enables or disables the "please wait" screen.
void setWaitScreen(boolean set) {
findViewById(R.id.screen_main).setVisibility(set ? View.GONE : View.VISIBLE);
findViewById(R.id.screen_wait).setVisibility(set ? View.VISIBLE : View.GONE);
}
void complain(String message) {
Log.e(TAG, "**** TrivialDrive Error: " + message);
alert("Error: " + message);
}
void alert(String message) {
AlertDialog.Builder bld = new AlertDialog.Builder(this);
bld.setMessage(message);
bld.setNeutralButton("OK", null);
Log.d(TAG, "Showing alert dialog: " + message);
bld.create().show();
}
void saveData() {
/*
* WARNING: on a real application, we recommend you save data in a secure way to
* prevent tampering. For simplicity in this sample, we simply store the data using a
* SharedPreferences.
*/
SharedPreferences.Editor spe = getPreferences(MODE_PRIVATE).edit();
spe.putInt("tank", mTank);
spe.commit();
Log.d(TAG, "Saved data: tank = " + String.valueOf(mTank));
}
void loadData() {
SharedPreferences sp = getPreferences(MODE_PRIVATE);
mTank = sp.getInt("tank", 2);
Log.d(TAG, "Loaded data: tank = " + String.valueOf(mTank));
}
}
登録:
投稿 (Atom)